
1.PySpark简介
Apache Spark是一个闪电般快速的实时处理框架。它进行内存计算以实时分析数据。由于Apache Hadoop MapReduce仅执行批处理并且缺乏实时处理功能,因此它开始出现。因此,引入了Apache Spark,因为它可以实时执行流处理,也可以处理批处理。
Apache Spark是Scala语言实现的一个计算框架。为了支持Python语言使用Spark,Apache Spark社区开发了一个工具PySpark。我们可以通过Python语言操作RDDs
RDD简介
RDD (Resiliennt Distributed Datasets)
•RDD = 弹性 + 分布式 Datasets
1)分布式,好处是让数据在不同工作节点并行存储,并行计算
2)弹性,指的节点存储时,既可以使用内存,也可以使用外存
•RDD还有个特性是延迟计算,也就是一个完整的RDD运行任务分成两部分:Transformation和Action
Spark RDD的特性:
-
分布式:可以分布在多台机器上进行并行处理 -
弹性:计算过程中内存不够时,它会和磁盘进行数据交换 -
基于内存:可以全部或部分缓存在内存中 -
只读:不能修改,只能通过转换操作生成新的 RDD
2.Pandas和PySpark对比
可以参考这位作者的,详细的介绍了pyspark与pandas之间的区别:https://link.zhihu.com/?target=https%3A//blog.csdn.net/suzyu12345/article/details/79673483
3.PySpark实战小练
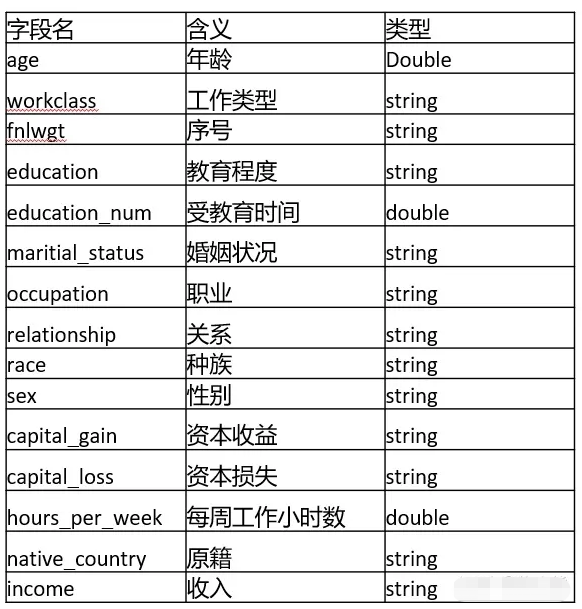
数据集:从1994年人口普查数据库中提取。
TO DO:预测一个人新收入是否会超过5万美金
参数说明:
创建SparkSession
from pyspark.sql import SparkSessionspark=SparkSession.builder.appName("adult").getOrCreate()读取数据
df = spark.read.csv("adult.csv", inferSchema = True, header=True) #读取csv文件df.show(3) #用来显示前3行注意:pyspark必须创建SparkSession才能像类似于pandas一样操作数据集
我们看看数据集:
cols = df.columns #和pandas一样看列名df.printSchema()root|-- age: integer (nullable = true)|-- workclass: string (nullable = true)|-- fnlwgt: integer (nullable = true)|-- education: string (nullable = true)|-- education-num: integer (nullable = true)|-- marital-status: string (nullable = true)|-- occupation: string (nullable = true)|-- relationship: string (nullable = true)|-- race: string (nullable = true)|-- sex: string (nullable = true)|-- capital-gain: integer (nullable = true)|-- capital-loss: integer (nullable = true)|-- hours-per-week: integer (nullable = true)|-- native-country: string (nullable = true)|-- income: string (nullable = true)
#找到所有的string类型的变量#dtypes用来看数据变量类型cat_features = [item[0] for item in df.dtypes if item[1]=="string"]# 需要删除 income列,否则标签泄露cat_features.remove("income")#找到所有数字变量num_features = [item[0] for item in df.dtypes if item[1]!="string"]对于类别变量我们需要进行编码,在pyspark中提供了StringIndexer, OneHotEncoder, VectorAssembler特征编码模式:
from pyspark.ml import Pipelinefrom pyspark.ml.feature import StringIndexer, OneHotEncoder, VectorAssemblerstages = []for col in cat_features: # 字符串转成索引 string_index = StringIndexer(inputCol = col, outputCol = col + "Index") # 转换为OneHot编码 encoder = OneHotEncoder(inputCols=[string_index.getOutputCol()], outputCols=[col + "_one_hot"]) # 将每个字段的转换方式 放到stages中 stages += [string_index, encoder]# 将income转换为索引label_string_index = StringIndexer(inputCol = "income", outputCol = "label")# 添加到stages中stages += [label_string_index]# 类别变量 + 数值变量assembler_cols = [c + "_one_hot" for c in cat_features] + num_featuresassembler = VectorAssembler(inputCols=assembler_cols, outputCol="features")stages += [assembler]# 使用pipeline完成数据处理pipeline = Pipeline(stages=stages)pipeline_model = pipeline.fit(df)df = pipeline_model.transform(df)selected_cols = ["label", "features"] + colsdf = df.select(selected_cols)因为pyspark显示的数据比较像Mysql 那样不方便观看,因此我们转成pandas:
import pandas as pdpd.DataFrame(df.take(20), columns = df.columns)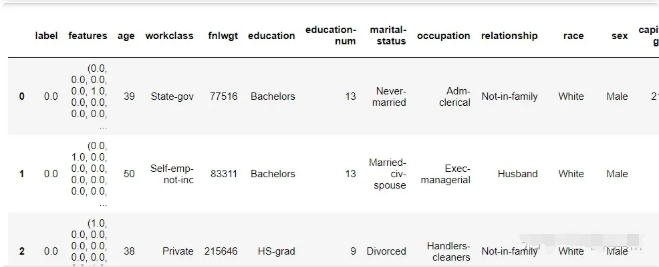
通过pandas发现,好像还有较多字符串变量,难道特征编码失败了?
原来是使用VectorAssembler直接将特征转成了features这一列,pyspark做ML时 需要特征编码好了并做成向量列,
到这里,数据的特征工程就做好了。
分割数据集 测试集
train, test = df.randomSplit([0.7, 0.3], seed=2021)print(train.count())print(test.count())227959766
可以看到,训练集和测试集安装7:3的比例分割了,接下来就是构建模型进行训练。
逻辑回归
from pyspark.ml.classification import LogisticRegression# 创建模型lr = LogisticRegression(featuresCol = "features", labelCol = "label",maxIter=10)lr_model = lr.fit(train)可以看到ML的用法和sklearn非常的像,因此使用起来也是相当的方便。
#结果预测predictions = lr_model.transform(test)看看predictions的结构
predictions.printSchema()root|-- label: double (nullable = false)|-- features: vector (nullable = true)|-- age: integer (nullable = true)|-- workclass: string (nullable = true)|-- fnlwgt: integer (nullable = true)|-- education: string (nullable = true)|-- education-num: integer (nullable = true)|-- marital-status: string (nullable = true)|-- occupation: string (nullable = true)|-- relationship: string (nullable = true)|-- race: string (nullable = true)|-- sex: string (nullable = true)|-- capital-gain: integer (nullable = true)|-- capital-loss: integer (nullable = true)|-- hours-per-week: integer (nullable = true)|-- native-country: string (nullable = true)|-- income: string (nullable = true)|-- rawPrediction: vector (nullable = true)|-- probability: vector (nullable = true)|-- prediction: double (nullable = false)
抽取需要的信息
selected = predictions.select("label", "prediction", "probability", "age", "occupation")display(selected)selected.show(4)技术AUC值
from pyspark.ml.evaluation import BinaryClassificationEvaluator# 模型评估,通过原始数据 rawPrediction计算AUCevaluator = BinaryClassificationEvaluator(rawPredictionCol="rawPrediction")print("AUC:", evaluator.evaluate(predictions))AUC:0.9062153434371653
进行网格调参
from pyspark.ml.tuning import ParamGridBuilder, CrossValidator# 创建网络参数,用于交叉验证param_grid = (ParamGridBuilder() .addGrid(lr.regParam, [0.01, 0.5, 2.0]) .addGrid(lr.elasticNetParam, [0.0, 0.5, 1.0]) .addGrid(lr.maxIter, [1, 5, 10]) .build())# 五折交叉验证,设置模型,网格参数,验证方法,折数cv = CrossValidator(estimator=lr, estimatorParamMaps=param_grid, evaluator=evaluator, numFolds=5)# 交叉验证运行cv_model = cv.fit(train)# 对于测试数据,使用五折交叉验证predictions = cv_model.transform(test)print("AUC:", evaluator.evaluate(predictions))AUC:0.9054096433333642
决策树模型
from pyspark.ml.classification import DecisionTreeClassifier# 创建决策树模型dt = DecisionTreeClassifier(featuresCol = "features", labelCol = "label", maxDepth = 3)dt_model = dt.fit(train)#查看决策树结构print(dt_model._call_java("toDebugString"))DecisionTreeClassificationModel: uid=DecisionTreeClassifier_4bd113e9a3c2, depth=3, numNodes=11, numClasses=2, numFeatures=100If (feature 23 in {0.0})If (feature 97 <= 7792.0)Predict: 0.0Else (feature 97 > 7792.0)If (feature 94 <= 19.5)Predict: 0.0Else (feature 94 > 19.5)Predict: 1.0Else (feature 23 not in {0.0})If (feature 96 <= 12.5)If (feature 97 <= 3368.0)Predict: 0.0Else (feature 97 > 3368.0)Predict: 1.0Else (feature 96 > 12.5)Predict: 1.0
predictions = dt_model.transform(test)predictions.printSchema()root|-- label: double (nullable = false)|-- features: vector (nullable = true)|-- age: integer (nullable = true)|-- workclass: string (nullable = true)|-- fnlwgt: integer (nullable = true)|-- education: string (nullable = true)|-- education-num: integer (nullable = true)|-- marital-status: string (nullable = true)|-- occupation: string (nullable = true)|-- relationship: string (nullable = true)|-- race: string (nullable = true)|-- sex: string (nullable = true)|-- capital-gain: integer (nullable = true)|-- capital-loss: integer (nullable = true)|-- hours-per-week: integer (nullable = true)|-- native-country: string (nullable = true)|-- income: string (nullable = true)|-- rawPrediction: vector (nullable = true)|-- probability: vector (nullable = true)|-- prediction: double (nullable = false)
#计算AUC值from pyspark.ml.evaluation import BinaryClassificationEvaluatorevaluator = BinaryClassificationEvaluator()evaluator.evaluate(predictions)0.7455098804457034
网格搜参数
from pyspark.ml.tuning import ParamGridBuilder, CrossValidatorparam_grid = (ParamGridBuilder() .addGrid(dt.maxDepth, [1, 2, 6, 10]) .addGrid(dt.maxBins, [20, 40, 80]) .build())# 设置五折交叉验证cv = CrossValidator(estimator=dt, estimatorParamMaps=param_grid, evaluator=evaluator, numFolds=5)# 运行cvcv_model = cv.fit(train)# 查看最优模型print("numNodes = ", cv_model.bestModel.numNodes)print("depth = ", cv_model.bestModel.depth)numNodes = 429depth = 10
# 使用五折交叉验证进行预测predictions = cv_model.transform(test)evaluator.evaluate(predictions)0.7850384321616918
随机森林
from pyspark.ml.classification import RandomForestClassifier# 随机森林rf = RandomForestClassifier(featuresCol = "features", labelCol = "label")rf_model = rf.fit(train)predictions = rf_model.transform(test)predictions.printSchema()selected = predictions.select("label", "prediction", "probability", "age", "occupation")display(selected)evaluator = BinaryClassificationEvaluator()evaluator.evaluate(predictions)0.8932162982538805
一样的方法
param_grid = (ParamGridBuilder() .addGrid(rf.maxDepth, [3, 5, 7]) .addGrid(rf.maxBins, [20, 50]) .addGrid(rf.numTrees, [5, 10]) .build())cv = CrossValidator(estimator=rf, estimatorParamMaps=param_grid, evaluator=evaluator, numFolds=5)# 运行CV(大约6分钟)cv_model = cv.fit(train)predictions = cv_model.transform(test)evaluator.evaluate(predictions)0.8948376797236669
查看模型的结构和特征重要性
best_modelRandomForestClassificationModel: uid=RandomForestClassifier_15bbbdd6642a, numTrees=10, numClasses=2, numFeatures=100
best_model.featureImportances太长了省略
df.schema["features"].metadatatemp = df.schema["features"].metadata["ml_attr"]["attrs"]df_importance = pd.DataFrame(columns=["idx", "name"])for attr in temp["numeric"]: temp_df = {} temp_df["idx"] = attr["idx"] temp_df["name"] = attr["name"] #print(temp_df) df_importance = df_importance.append(temp_df, ignore_index=True) #print(attr["idx"], attr["name"]) #print(attr) #breakdf_importance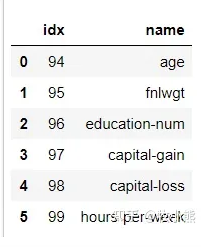
for attr in temp["binary"]: temp_df = {} temp_df["idx"] = attr["idx"] temp_df["name"] = attr["name"] df_importance = df_importance.append(temp_df, ignore_index=True)df_importance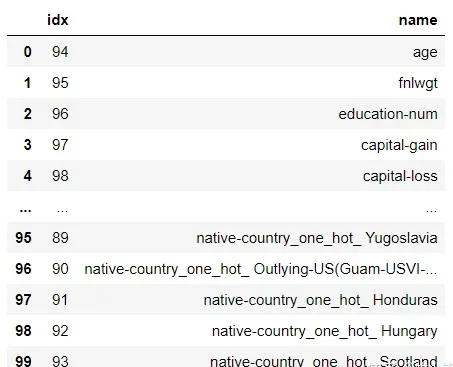
对特征重要性进行可视化
df_temp = pd.DataFrame(best_model.featureImportances.toArray())df_temp.columns = ["feature_importance"]df_importance = df_importance.merge(df_temp, left_index=True, right_index=True)df_importance.sort_values(by=["feature_importance"], ascending=False, inplace=True)df_importance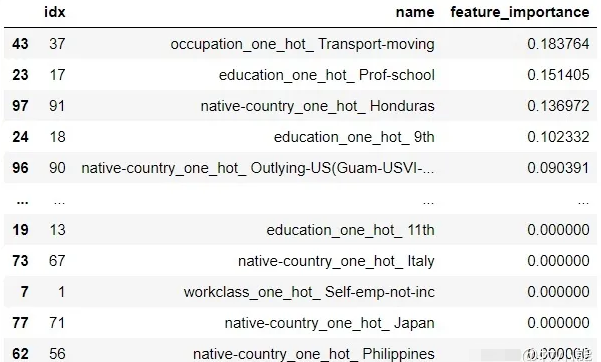
4.小结
本节选用了一个常规的数据集,需要通过UCI提供的数据预测个人收入是否会大于5万,本节用PySpark对数据进行了读取,特征的编码以及特征的构建,并分别使用了逻辑回归、决策树以及随机森林算法展示数据预测的过程。
spark通过封装成pyspark后使用难度降低了很多,而且pyspark的ML包提供了基本的机器学习模型,可以直接使用,模型的使用方法和sklearn比较相似,因此学习成本较低。
End.
作者:牧小熊
本文为转载分享,如果涉及作品、版权和其他问题,请联系我们第一时间删除(微信号:lovedata0520)
更多文章前往首页浏览http://www.itongji.cn/
- 我的微信公众号
- 微信扫一扫
-

- 我的微信公众号
- 微信扫一扫
-


评论